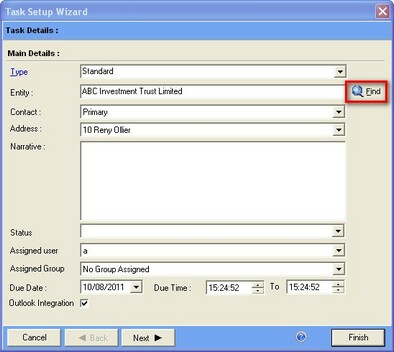
The Add Task wizard is primarily used as its name suggests, to add a task, however this wizard is also used to edit tasks as well, the only difference is when editing tasks the information will already be present in the different fields. When launching the add task wizard the user will be presented with the following screen.

This first page on the add task wizard is used to select the task type, these are listed below, select the entity to create the task for, to select the entity the user can use the find button which launches the global entity search. The contact drop down menu is used to select the address type for the entity selected, when changing the address type, the address in the address box will change.
Next the user can enter the task Narrative, which is where the user can enter any details about the task, and is how the user can identify which task it is.
The assigned user and assigned group menu's control which user and which group to create the task for, this selection will affect how the task is displayed on the task scheduler, for example a task assigned to the administrators group will only appear if the user selects the administrators workgroup filter. The assigned date is the date that the task is scheduled for, the assigned time is the start time of the task and the To box is the end time of the task.
The task types available are Standard, Appointment, Communications Log, Meetings, and TimeSheet Task (Must be enabled in enVisual Configuration)
Once all of this information has been filled in you can click the next button to continue.

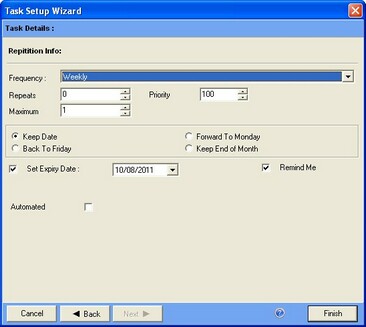
The next screen on the add task wizard is where the user sets details on if the task is repeatable. This screen has options to set the frequency of the task, this can be done by using predefined periods such as weekly, fortnightly and monthly. The number of repeats does exactly what it says, it sets how many times the task will repeat itself, this can be set to a maximum number of 9999. The options labeled Keep Date, Forward To Monday, Back To Friday and Keep End of Month, are used to set when the tasks will be generated, so that tasks are not being generated at random times. The Set Expiry Date options sets when the task should stop being generated.
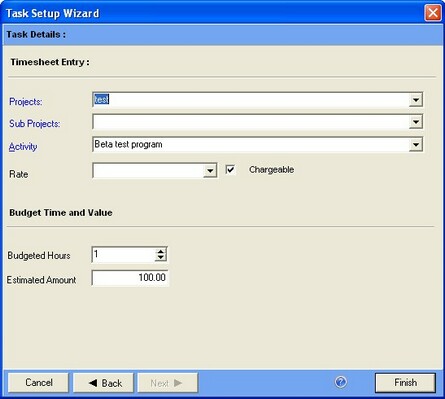
If you are adding a TimeSheet Task, there is one more screen to be filled in, this screen is shown below.

On this final screen, you can select the project and sub project that this task is being created for. Next you can select which activity this task will be completing, and which charge rate is to be used for this activity. Finally you can enter the number or hours that the task will take, this will be automatically selected based on the start and end time selected on the first page.
Clicking Finish will complete the add task wizard, and will start the tasks being generated.