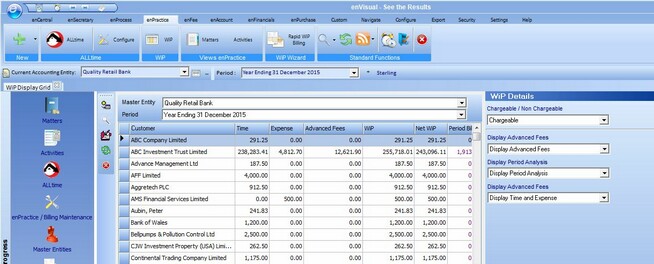
The Work in Progress grid (or WiP) is very similar to ALLtime as you can enter expenses and activities directly into WiP. All activities and expenses posted in ALLtime are also posted to the WiP Grid, which is shown below:

WiP is split into three different categories:
| • | Chargeable - Customer needs to pay for this WiP. |
| • | Non Chargeable - Customer does not need to pay for this WiP. |
| • | Deferred - WiP items that have been postponed until a later date. |
There are four sections to the WiP grid, these sections are detailed below:
The control buttons are the five buttons that appear down the left hand side of the WiP grid, these buttons are described below
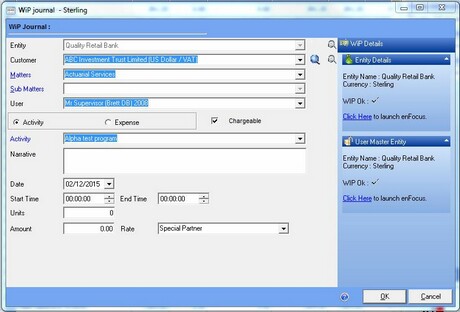
The add WiP journal button is used to add activities and expenses to WiP in much the same way that ALLtime does. Clicking on a customer and pressing this button will display the following screen with the defaults for the selected entity:

On this screen you can select the following information:
| • | Customer - who the work is being completed for. |
| • | Matter - the project being worked on. |
| • | Sub Matter - the sub project being worked on (where applicable). |
| • | User - the person responsible for carrying out the work. |
| • | Chargeable - identifies if the customer is paying (or is to be charged) for this work. |
| • | Activity/Expense check option - this option simply allows you to specify if the journal is an activity or an expense. |
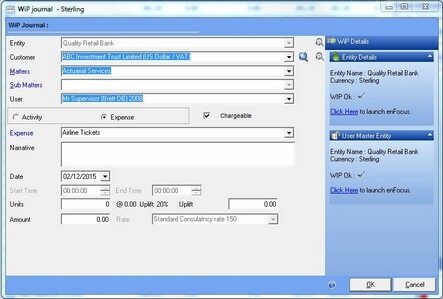
If you select the expense option the bottom half of the screen will change from the above screen to the below screen:

Expenses are a applied to the selected customer directly and can be configured in enPractice Maintenance as shown here. They can also be added via ALLtime.
The Rest of the Fields are described below:
| • | Activity/Expense - Select which activity/expense is being carried out as part of this work. |
| • | Narrative - Enter any information about the journal into this box. |
| • | Date - When the work was completed. |
| • | Start time - When the work was started (not available for expenses). |
| • | End time - When the work was completed (not available for expenses). |
| • | Units - Number of full units of time spent on this work for example there could be 4 units per hour, this is setup in ALLtime maintenance. |
| • | Amount - The total cost of the work (this may pre-populate based on the Rate set and the time frame). |
| • | Uplift - Percentage of additional cost added to the amount field (for Expenses). |
| • | Rate - The cost per hour for the work being carried out. See Charge Rates for configuration. |
Once all of this information has been added you can click the ok button to add the WiP journal to the system.
Locate Customer
Allows the use of the GES search tool to locate a specific entity.
Write off WiP
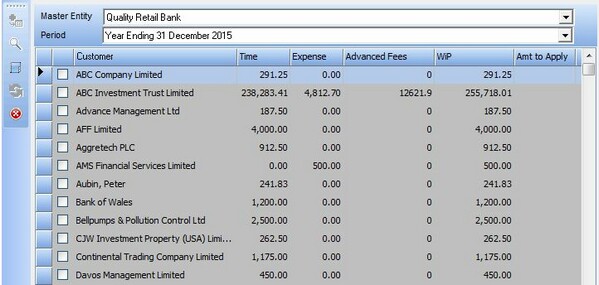
This is a bulk version of the 'Write Off' function explained in the WiP Drill Down section. It allows the user to select customers for mass write off of all time/expenses.

To cancel the mass write off, simply press the blue button on the left hand panel WITHOUT ticking any entities.
Refresh
This button will simply refresh the information in the grid (F5 alternative).
Exit
This will close the WiP grid.
The WiP details section is the panel that appears down the right hand side of the WiP grid and allows for some advanced filtering options on the WiP grid. It also displays a 'WiP Trend' graph for the selected entity which will display the amount of entries added per period.
| • | Chargeable/Non Chargeable - Allows the filtering of the grid to only show Chargeable WiP or Non Chargeable WiP. |
| • | Display Advanced Fees - Controls whether to hide or display Advanced Fees and the column conveying this information. |
| • | Display Period Analysis - Toggles the display of the 'Period Billed', 'Written Off' and 'Written Up' fields. |
| • | Display Time and Expense - Toggles the display of either only Time or Expense options, or both. |
The Totals at the bottom of the WiP grid are complete totals for all items in the WiP grid. They display in column order from left to right as such;
Time, Expense, Advanced Fees, Total WiP, Net WiP.