IMPORT AND EXPORT
360 > Imports/Exports.
This module enables the imports and export of files within 360.

IMPORT
This section allows imports from other sources into 360. The Import Options screen on the right is disabled until one of the Available Imports on the left is selected. The import section is displayed below
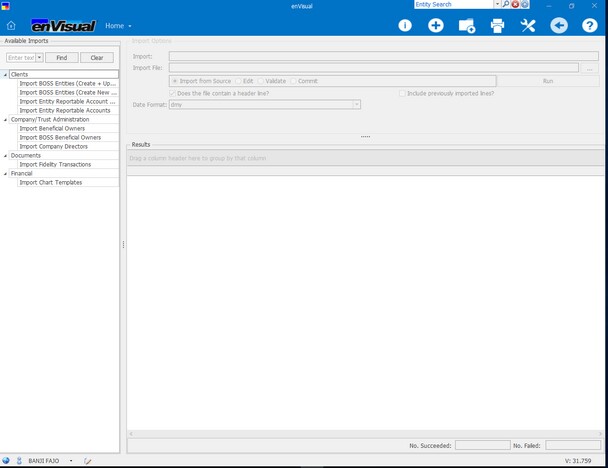
Available Imports: this displays what types of imports are available for the application. These imports are: Clients, Company/Trust Administration, Documents and Financial.
Import Options: this section displays the following:
Import: this displays the import selected from available imports on the left
Import File: this displays the file selected and that is about to be imported. it displays the location of the file.
The file can be selected by pressing ![]() button, which will load up file windows. User can then navigate to the file needed for import. The file to be imported has to be accessible by the sql server, therefore it is recommended putting the file in the central envisual share. Options available when the file has been selected are:
button, which will load up file windows. User can then navigate to the file needed for import. The file to be imported has to be accessible by the sql server, therefore it is recommended putting the file in the central envisual share. Options available when the file has been selected are:
| o | Import from Source: this enables the file to be imported into the application |
| o | Edit: this enables the file to be edited. When selected, will make the screen editable. |
| o | Validate: this enable any changes done in edit mode to be validated and updates the screen. |
| o | Commit: this imports the file into the application. This is the final stage of import. |
When an option from above has been selected, the Run button will need to be pressed for the action to take place, which will then display/update in the Results section.
Other options available here are:
Does the file contain a header line? This is to be used when the file imported contains a header. Header in each import will vary. This tick box has been ticked by default, however can be unticked if required. When unticked, will display column headers with excel formats in the result sections.
Include previously imported lines? This can be used to decide whether user want to import lines that have already imported or not. When ticked will import previously imported lines and when unticked, will import new lines only.
Date format: This can be used to select the date column of the grid, this will then check if the date is valid. Based on the date option selected, a validation message will be displayed when the date in the column does not match the option selected. The date format option that are available are: dmy, mdy and ymd. (where d is day, m is month and y is year)
Results: this section displays the results of file imported. This section displays the content in the file. Columns available here will vary and depend on the type of imports been done. However, general columns that are available on all imports are as follow:
Row ID: This will display the row id for the row selected
Selected: Tick box can be used to select what row needs importing and which not. When selected will import the line and when not selected, will not import the line. This has been default to select all when import is done, however, use can deselect as required.
Status: This will be ticked when all the columns for the line has passed all validations required and will be unticked when a validation has failed. i.e one of the columns is empty or contains invalid inputs/data.
Status Message: This column displays validation messages for each line/row. A validation message “Verified Successfully” will be displayed when a column passes all the validation checks and a different validation message will be displayed when a line/row fails a validation. Messages displayed for failed validations will vary depending on the validation that it failed on. Failed validation messages will be discussed in details with each imports type further in this document. A validation message “import successfully” will be displayed when a line/row has been imported.
Entity Code: This will display the entity that is attached for the import. Basically, which entity the import is for. This column cannot be left blank. It accepts valid entity codes only. Validation message “Could not find an Entity in the system matching the code provided” will be displayed for an invalid entity code. The column is also mandatory and cannot be left blank, when blank will display validation message “Entity code column is empty”
Change/New: Column to be used if the line is a new or changed/edited line. The column is text free.
Verified: This column displays if the line has been verified or not. This column only accepts the following: 1 or Yes which means the line has been verified and a 0 or No which means the line has not been verified. The column has been default to verified, however can be edited as required. When not verified will display validation message “Line not set has being verified”. This will also display when the column is left blank.
Imported: This column can be used to decide if a line has been imported already or not. Just like verified column, this column only accepts 1 or Yes to indicate the line has been imported already and does not to be imported again. 0 or No to import the line. However, when the column contains 1 or Yes, will display validation message “Line already marked has imported”. To reimport the line again, simply change the column to 0 or No.
No. Succeeded and Failed: this will display how many rows from the result was successful and failed. Success will be display in succeeded field while fail will be displayed in failed field.
Client Imports - Imports available here are:
| • | Import BOSS Entities (Create + Update Records) |
| • | Import BOSS Entities (Create New Only) |
| • | Import Entity Reportable Account Payment |
| • | Import Entity Reportable Accounts |
Import Entity Reportable Accounts.
This is to be used for importing reportable accounts in excel. Excel formats acceptable here are .xls, xlsx and csv. Select reportable account on the left will enable the import options on the right as shown below.
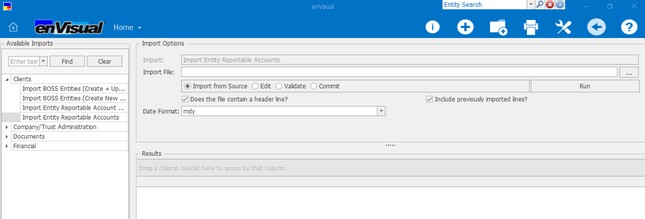
To import a reportable account, simply press the ![]() button, then select the file required. Once selected and displays in the import file field, an additional option will be displayed called Sheet Name. This can then be used to select which sheet in the excel is to be imported.
button, then select the file required. Once selected and displays in the import file field, an additional option will be displayed called Sheet Name. This can then be used to select which sheet in the excel is to be imported.
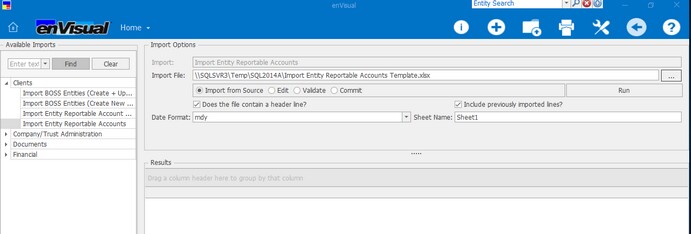
Next step is to ensure ‘import from source’ option is selected, then press the run button, which then import the contents in the file as shown below
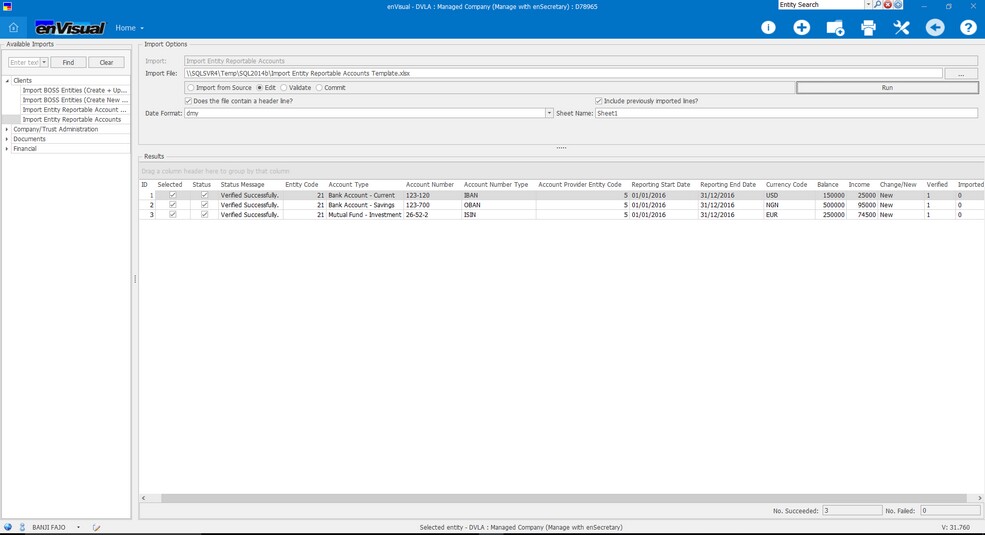
The file can then be edited if required by selecting the Edit button, when finish editing, select Validate button and then Run. Once the edit has been validated, select Commit and then press Run to import the file into the application. If editing is not required after Import from Source, select Validate next and press run and then select Commit then Run.
Columns displayed here for import entity reportable accounts excluding general columns are as follows:
Account Type: This column will display what account type it is. This column is text free, however cannot be left blank. When blank will display validation message “Account Type Column is empty”
Account Number: This column will display the account number for the reportable account. This column is also free text but cannot be left blank. When blank will display validation message “Account Number column is empty”
Account Number Type: This column only accepts valid account number types which are: Iban, Oban, Isin, Osin and Others. Any other text/word inputted in this column will be reject and display validation message of “Could not find an Account Number Type in the system matching the code provided”. This column also cannot be left blank, when blank will display validation message “Account Number Type column is empty”
Account Provider Entity Code: This display the account provider entity code for the reportable account. This column is mandatory and only accepts valid account entity code. A validation message “Could not find an Account Provider in the system matching the code provided” will be displayed for an invalid account provider entity code. This column is also mandatory and cannot be left blank, when blank will display validation message “Account Provider Entity code column is empty”
Reporting Start/End Date: This column contains the reporting start and end dates respectively. This column uses the date format selected in the date format field, (dmy, mdy or ymd). A validation message “Date does not match the date format” will be displayed when the format does not match. Validation message “Date column is empty” will be displayed when the column is empty or blank.
Currency Code: This column contains the currency code for the reportable account. Only valid currency codes are accepted. Validation message “Could not find a Currency in the system matching the code provided” will be displayed for an invalid currency code. Validation message “Currency Code is empty” will be displayed when the column is blank.
Balance: This column displays the balance amount. The column can be left blank and not mandatory. It also accepts 0 balance.
Income: Similar to balance column, it displays the reportable account income. It can be left blank and accepts 0 income.
The reportable account import can then be viewed by selecting the entity it has been imported for and pressing envisual Home > Clients > Compliance > Reportable Accounts as shown below

Note: when a new import is done with the same file and the following columns: Entity Code, Account Type, Account Number and Account Provider Entity Code remains the same and other columns edited or changed, this will update the existing details. However, when one of them changes, a new record will be displayed.
To delete a reportable account, simply right click on the account and select Delete Reportable Account. This will also delete any payment that is linked to the account.
Import Entity Reportable Accounts Payments
This option is to be for importing Entity Reportable Accounts Payment. However, for this report to import correctly, the Entity Reportable Accounts has to be imported first. The reportable accounts payment is linked to Entity Code and Account Number in the reportable accounts.

To import Entity Reportable Account Payment, select the option on the left, this will then display on the right. Select/locate the file using the window button. (similar process to importing reportable accounts). When imported, will display a screen below
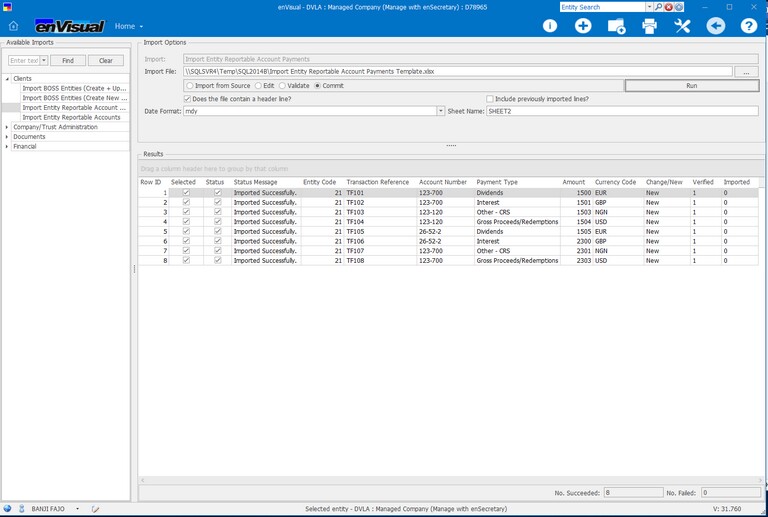
Columns displayed here for import entity reportable account payments excluding general columns are as follows:
Transaction Reference: This column is text free and contains the transaction reference for the line/row. This column can also be left blank. It is not a mandatory column.
Account Number: This is the account number the payment will be linked to. This column cannot be left blank. It is a mandatory column and only accepts valid account numbers. A validation message “Could not find a Reportable Account in the system matching the code provided” will be displayed for an invalid account number. “Account Number column is empty” will be displayed when the column is blank/empty.
Payment Type: This column accepts certain payment types which are: Interest, Dividends, Other – CRS and Gross Proceeds/Redemptions. These are the only words accepted in this column, any other text/word will be invalid displaying a validation message “Could not find a Payment Type in the system matching the code provided”. A blank payment type column will display validation message “Payment Type column is empty”
Amount: This column displays the payment amount. It can be left blank if required and also accepts 0 amount.
Currency Code: This column contains the currency code for the reportable account payment. Only valid currency codes are accepted. Validation message “Could not find a Currency in the system matching the code provided” will be displayed for an invalid currency code. Validation message “Currency Code is empty” will be displayed when the column is blank.
The reportable account payment import can then be viewed by selecting the entity it has been imported for and pressing envisual Home > Clients > Compliance > Reportable Accounts. Then select the appropriate account, which will then display the payment in the bottom half of the screen as shown below in the diagrams.
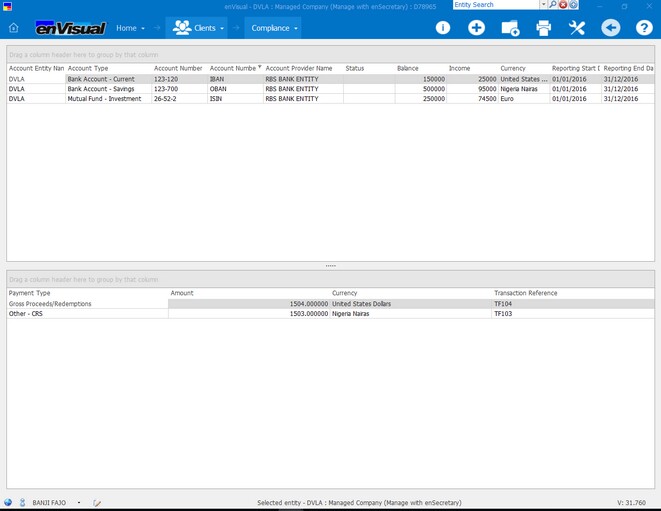
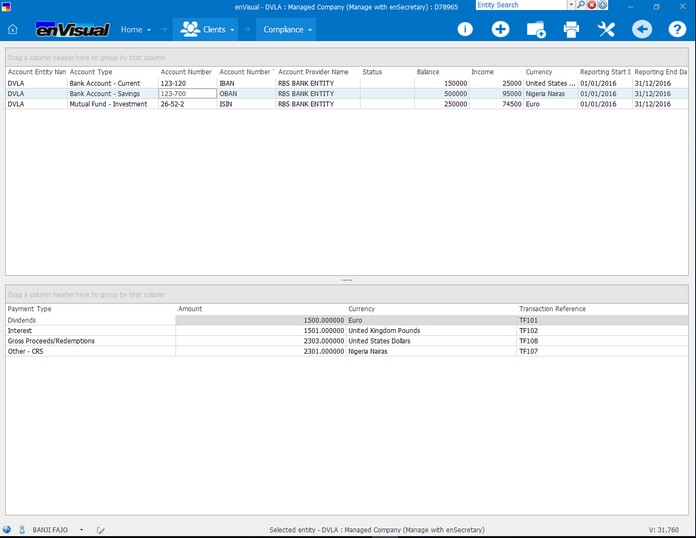
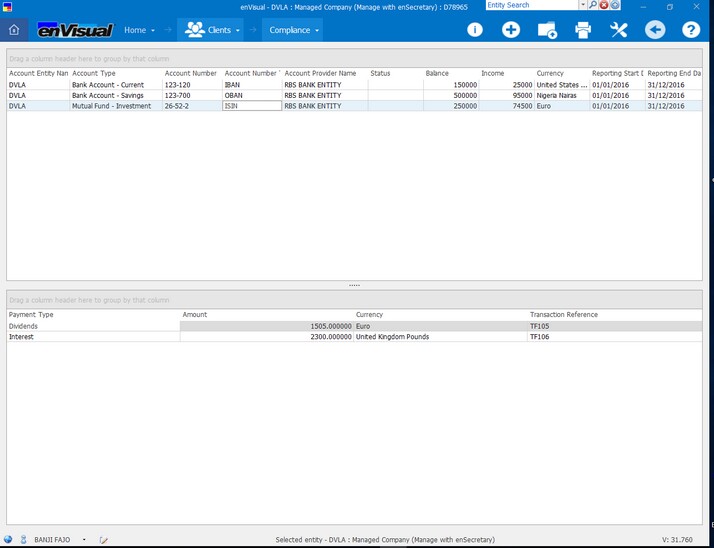
To delete a reportable account payment, right click on the payment and select Delete Reportable Account Payment.
Note: When a new import is done with the same file and the following columns: Entity Code, Transaction Reference and Account Number remains the same and other columns edited or changed, this will update the existing details. However, when one of them changes, a new record will be displayed.