|
Each person that works with enVisual requires a user account, this section will cover how to create, manage and delete user accounts, or users as referred to in enVisual.
To open the users screen in enVisual select the security tab and the press the users button as shown below.

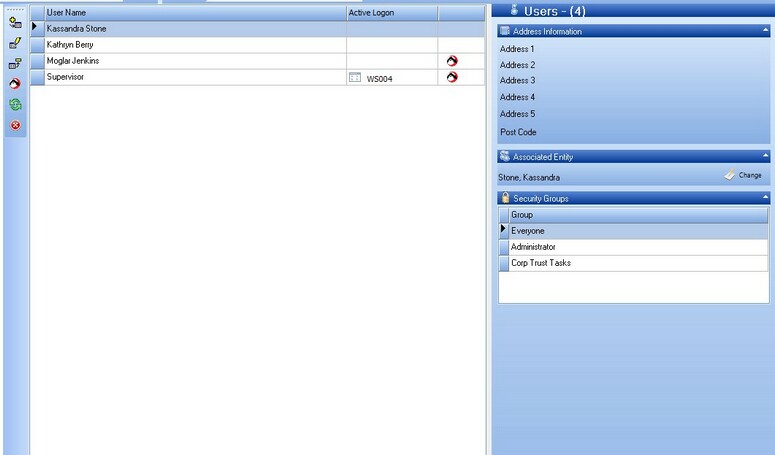
Once the users screen has loaded you will be presented with the following:

The users screen is split into 3 separate areas, each of these areas will be detailed below:
The control buttons section is the section on the left side of the users screen, which contains six buttons, these six buttons are detailed below
For details on how to Add a user to the system, please see the Adding a User Section
|
Clicking on the edit user button will take you onto the add user wizard, where you can add, edit or delete and information regarding the selected user. For more information on the add user wizard please see the Adding a User section.
|
The Delete user button is used to delete the selected user from the system, deleting a user from the system does not mean that the user is lost, they can be re-instated by using the user recycle bin in the navigate menu.
|
The Toggle ALLtime users button is used to change the list of users to show only ALLtime users, or to show all users depending on the current toggle status.
|
The refresh button is used to refresh the list of users in the list
|
The Close Button will close the users screen.
|
|
The Information Panel is the section on the right side of the users screen, this section shows the users address, a list of security groups that the user is a member of, and if the user is also an entity in enCentral.
To change the users address or user groups you can edit the user as detailed above.
If you would like to change the associated entity of the user, you can click on the change button next to the current associated entity, this will open the global entity search, which you can use to search for the new entity to associate with the selected user.
|
The user list will show all the users in the system (providing the ALLtime filter is not on). The User list shows the users fullname, which workstation the user i logged onto, if any, and if the user is an ALLtime user.
From the user list you can select any user and right click for some additional options, these options are detailed below:
This option can be used to set the password of the selected user, the password can be reset to the system default password or to a specific password entered by the user.
|
Every screen in the system can be moved to a different location within the workspace, and the new location is remembered in a user basis, if the user would like to reset the position of all the screens in the system for them they can use this option.
|
The Reset Custom Settings option can be used to reset any user settings that the user has changed, back to the default settings
|
Transfer User Details can be used to transfer all of the non-personal user settings and details from one user to another.
|
The Make User Contact option can be used to add an entity to the system using the users details. A confirmation box will appear when you click this option.
|
The Assign Groups Option will take you to the assign user groups section of the add user wizard for the selected user, for more information on the add user wizard please see the Adding a User section.
|
The Logoff User does exactly what it says, this will terminate the selected users session, meaning they have to restart enVisual in order to continue working. This option is useful if a computer loses connection to the database, the database may think that the user is still connected, but they are not.
|
The Delete User option works in the same way as pressing the delete user button, this will delete the selected user from the system, and put them in the user recycle bin so they can be un-deleted at a later stage if needed. A confirmation box will appear when you click this option.
|
|
|

