|
The enFee module is used to generate invoices or bills for customer based upon work that has been carried out, when a customer pays these invoices or bills a receipt is generated as a record of this payment.
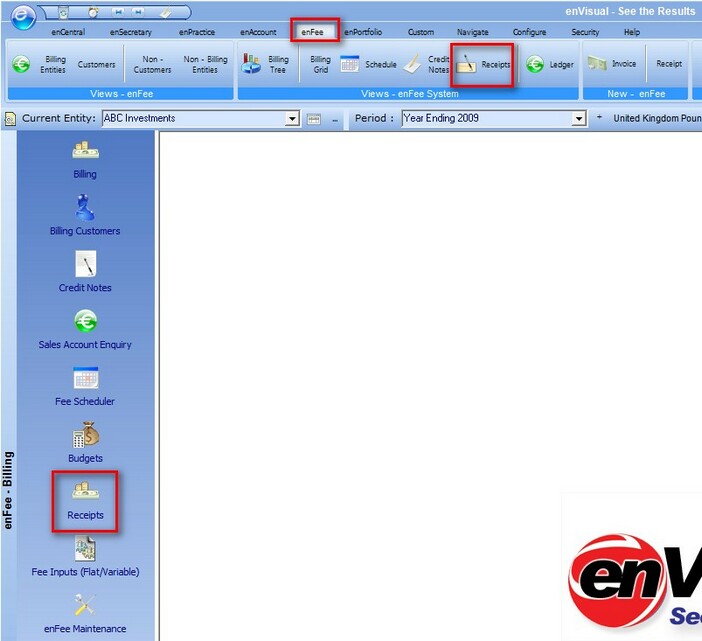
To access the receipts grid the user can simply open the enFee tab in enVisual and click on the Receipts button on the modbar or the navbar as shown below:
When the receipts grid launches you are presented with the screen shown below:
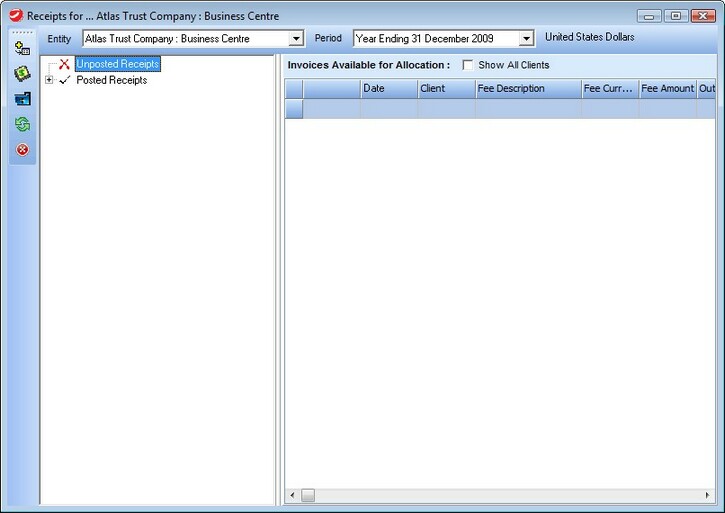
The receipts grid is split into 4 different sections, these sections are details below:
In the control buttons section there is a total of five buttons, these buttons are detailed below
To add a receipt press the add receipt button and you will be presented with the following screen:
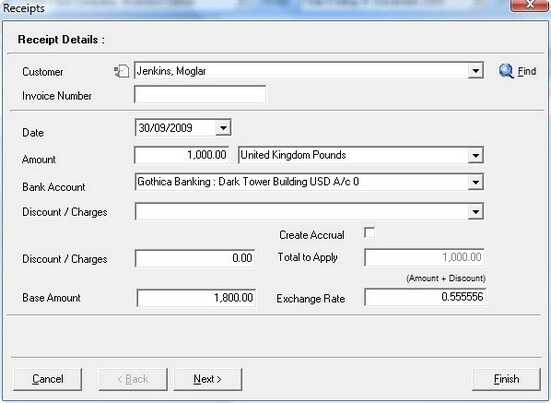
Each of the fields on the screen are explained below:
Customer - the name of the customer that the receipt is being created for.
Invoice Number - the invoice that the receipt is being created to pay for.
Find - the find button will simply allow the user to search for the customer to create the receipt for.
Date - the date the receipt is being created.
Amount - the amount to create the receipt for, following by the currency that the receipt is being paid in.
Bank Account - the account in the nominal ledger which the amounts will be posted to (must be a bank account)
Discount / Charges - if this receipt is entitle to any discounts or should be charged any excess amounts, these can be selected in the drop down box as a reason for the charge and the amount of the discount / charge can be entered into the box.
Total to Apply - this is the final amount of the receipt, before it is converted into he base currency for the billing entity. The total to apply is worked out by taking the amount and either subtracting charges or adding discounts.
Base Amount - this is the total amount in the billing entity's currency, this amount is worked out by taking the total in receipt currency and dividing it by the exchange rate. Updating this field will recalculate the exchange rate to match the base and receipt amounts.
Exchange Rate - this is the current exchange rate from the receipt currency to the base currency, changing this value will recalculate the base amount from the receipt amount.
Once of the the above information has been entered the user can click on the next button the take them to the next page in the add receipt wizard, which is shown below:
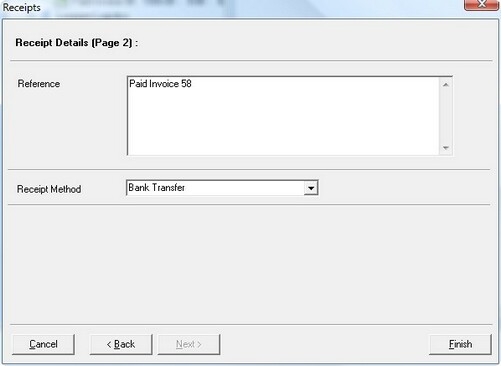
On this screen the user can select the payment method for the receipt, and can enter a reference for the receipt which will appear as the description in the receipts grid, it is usual practice to enter the invoice number in the reference box as in the above screenshot. Once all the information has been entered the user can click finish to create the receipt.
|
These receipts and invoices will show in the Sales Ledger for the entity belonging to the invoice(s).
|
Invoice Visibility
This button will toggle displaying the invoice section on the right side of the grid.
Refresh Data
This will simply reload the information in the grid to make sure that all the latest information is available.
Close
This will close the receipts grid
|
|
The entity selection bar is the bar that appears at the top of the receipts grid. The entity selection bar contains two drop down lists, the first of which contains a list of all the billing entities, where you need to select the billing entity you wish to create the receipt for. The second drop down list contains financial periods for the selected billing entity, these periods will be listed in descending order with the latest period at the top of the list. Finally the billing entities accounting currency is shown to the right end of the entity selection bar.
|
The Invoice details section is the right portion of the receipts grid, if the invoices section is not being displayed, the user can press the invoice visibility button to show the invoice section. The invoice details section shows many pieces of information about the each invoice these details as listed below.
Date - this is the date that the invoice was created on
Client - this is the customer (or client) which the invoice was sent to
Fee Description - this is the fee description that was entered when the invoice was created. This will default to the invoice number and the customer name.
Fee Currency - this is the currency that the invoice was created in.
Fee Amount - this is the amount the fee was created for in the fee currency.
Outstanding - this is the amount in fee currency that has not yet been paid off.
Tax - this is the total amount of tax added to the invoice.
The list of invoices in this section will change dependant on two things, the first factor is what you have selected in the receipts grid on the left, and the second factor is if you have the show all clients option checked. This gives 4 options for what will be displayed in the invoice list, these 4 options are shown below.
Customer Selected and Clients option checked - this will show all posted invoices for the current billing entity
Customer Selected and Clients option un-checked - this will show all posted invoices for the selected customer
Receipt Selected and Clients option checked - this will show all outstanding invoices for the current billing entity
Receipt Selected and Clients option un-checked - this will show all outstanding invoices for the customer who's receipt you have selected.
selecting the unposted or posted receipts entries will result in no invoices listed irrespective of having the show all clients option checked or not.
On the invoice section there is a right click option available for each invoice, which is show details, this is very simular to the show details option available in the receipts grid with the exception of the invoice details are shown on the first page not the receipt details. The second page is exactly the same as the second page when showing the details on a receipt, this can be used to unallocate an invoice from a receipt.
|
The receipts tree is the main section of the receipts grid, this section contains all the receipts for the selected billing entity and period. The receipts tree is split into two sections, posted and unposted, unposted receipts have not yet been posted to the nominal ledger. Within the posted and unposted sections, the receipts are split up into the different customers, so that you can expand just one customer to see only their receipts.
There are many different right click options available in the receipts grid, and the right click options change dependant on which item you right click on. When you right click on either unposted receipts or posted receipts, the following options are available:
Add Receipt - Used to add a receipt and gives the same as the add receipt button
Refresh Data - Used to refresh the receipts tree with current data, same as the refresh button
Expand Branch - Used to expand the selected node and all the customers within the selected node
Collapse Branch - Used to collapse the selected node and all the customers within the selected node.
When you have a customer selected the only right click option available is the Add Receipt option which functions in the exact same way as pressing the add receipts button.
When you right click on an unposted receipt there are five options available, these are shown below:
Edit Receipt
Used to edit the receipt details that were entered when the receipt was created.
Show Details
The Show Details option is the same as the Show Details option in the posted receipts section.
The transfer receipts option is used to transfer a receipt from one customer to another, this is useful if a receipt is created for the wrong customer, so the receipt doesn't have to be recreated, it can simply be transferred to a different customer. When you press the transfer option the following screen will be displayed:
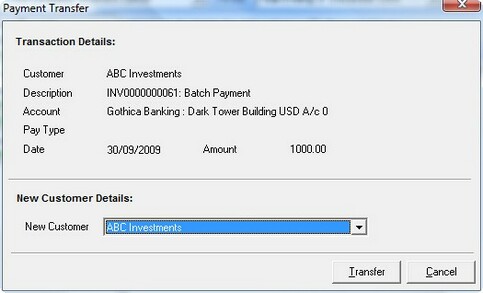
The top half of this screen shows all the receipt details, and the bottom half of the screen has a drop down list containing all the customers for the current billing entity. To transfer the receipt, simply select the new customer from the drop down list and then press the transfer button.
|
This option will post the receipt to the nominal ledger and allow the receipt to be allocated to invoices. The post receipts screen is shown below:
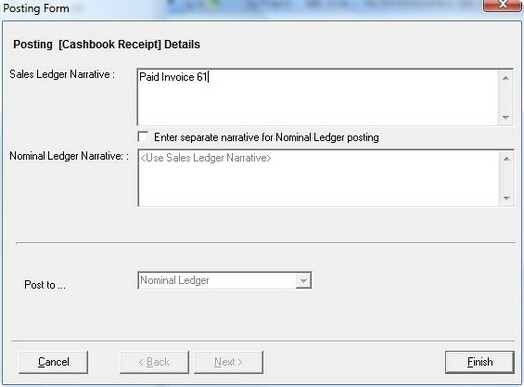
To post the receipt simply enter a narrative for the sales ledger, and either enter a separate narrative for the nominal ledger or use the same narrative as the sales ledger, once this information has been entered you can press the finish button to post the receipt.
|
Delete Receipt
Simply used to delete the receipt
When you right click on a posted receipt there are three options available, these three options are detailed below.
Selecting the Show Details section will display a screen with all the information about the selected receipt, including any information about invoices that have been allocated to the receipt. The Show Details screen is shown below:
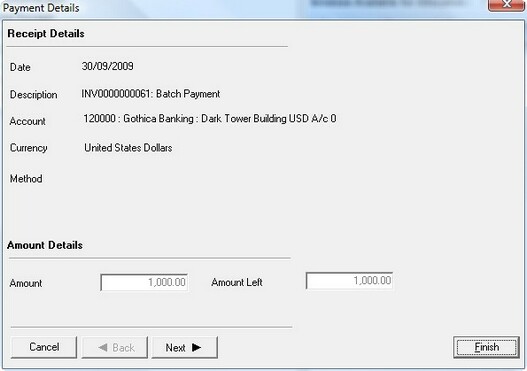
The information that is displayed on the screen is explained below:
Date - this is the date the receipt was created
Description - this is the description that was entered when the receipt was created, it is usual practice to put the invoice number the receipt has been created for in this field.
Account - this is the nominal ledger account that the receipt has been posted to.
Amount - this is the total amount of the receipt
Amount Left - this is the total amount of the receipt that has not yet been allocated to an invoice.
You can click next to see the information about an invoices that the receipt has been allocated to, this screen is shown below:
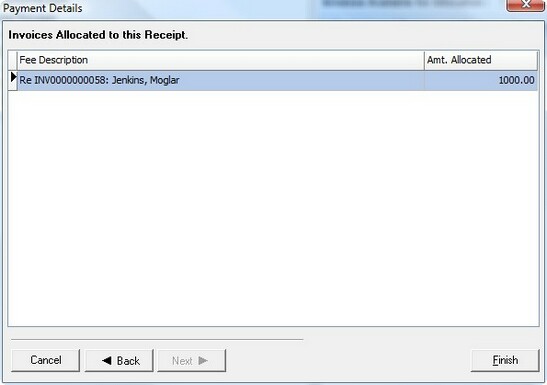
From this screen you can right click on any invoice to either see the details of the invoice, which will launch the invoice wizard for the selected invoice, and you can unallocate the invoice from the receipt. Unallocating an invoice will mean the invoice is no longer paid off and the receipt can be allocated against other invoices if needed, also if you need to reverse a receipt you will need to unallocate all invoices for this receipt before you can reverse the receipt.
|
The allocate payment option is the same option as using the drag and drop method to receipt allocation. The drag and drop method is where you select a receipt in the receipts tree and drag the receipt across to the invoice section and drop the receipt in the required invoice. Both methods use the same allocation screens with the exception of the below screen that only appears if you use the right click option:
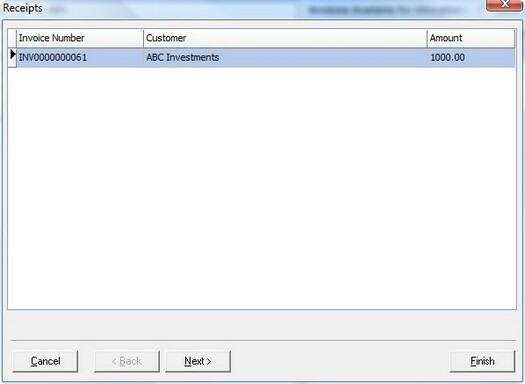
On this screen you can simply select the invoice you wish to allocate and click next to be prompted with the below screen which also appears straight away if you use the drag and drop allocation method:
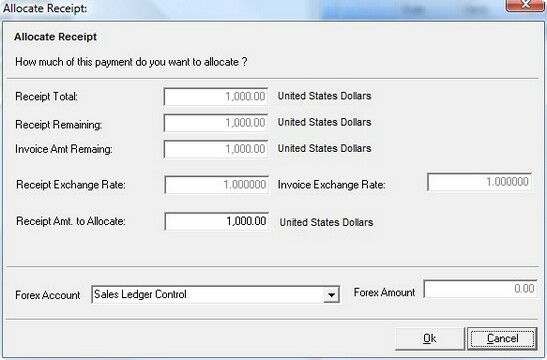
On this screen you can enter the amount of the receipt to allocate to the selected invoice, this is used is you don't want to allocate the full amount of the invoice or receipt, this amount cannot exceed the total amount remaining for the receipt. Once you have entered the amount to allocate you can click the ok button to allocate the receipt against the invoice. If the receipt would cause any profit or loss you will be promoted with a message saying the profit and loss amounts will also be posted, you can click ok on this message to continue or cancel to not allocate the receipt. Note: if the profit and loss is not posted this will cause variances between the sales ledger and the sales ledger control account in the nominal ledger.
|
If there are any mistakes with a receipt that need to be corrected, a receipt can be reversed so is available for editing providing that the receipt has not been allocated again an invoice, if it has been you will need to unallocate the receipt first, this is shown in the show details section above. Reversing a receipt will reverse all the transactions for the receipt in the sales and nominal ledger.
|
|
|


