EnVisual Home > Documents
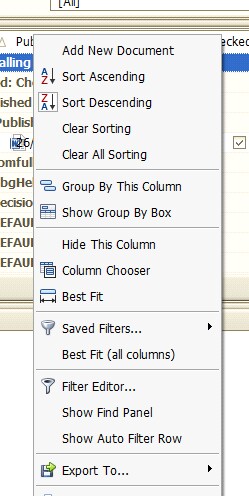
LiveFile consist of Managed and Unmanged Documents. A managed document is one where the document contents is controlled and monitored and can be used for audit purposes while an unmanaged document does not have such features. LiveFile Explorer is used to add, view and search any document that has been added into 360. This Section will explain how to perform all functions within LiveFile Explorer, which are Add, View and Search. Below is a view of LiveFile Explorer homepage with the homepage right click options
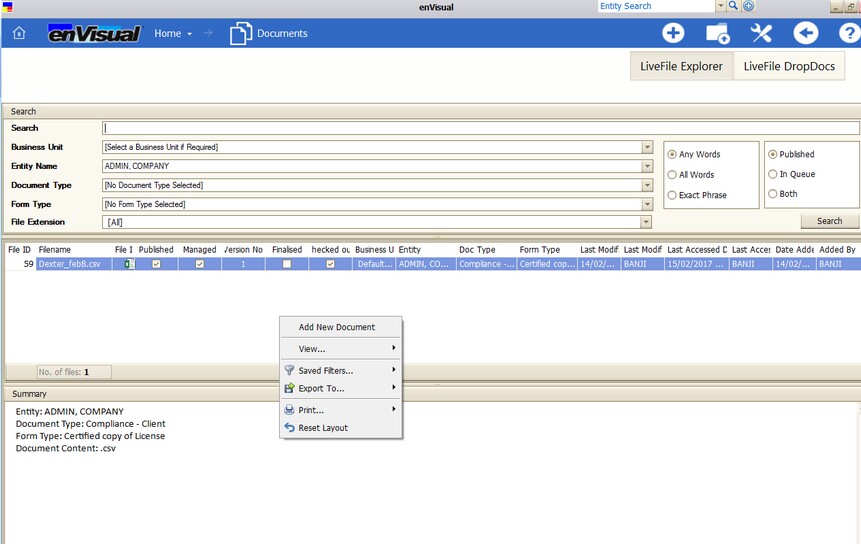
This homepage will always display with details that was last used or searched for when returned to after user logged in. The search bar can be used to search for files and document that have been added to LiveFile. User can also select the Business Unit, Entity Name, Document and Form Type and File Extension for search. Types of search available are: Published, In Queue and Both. User can then decide what kind of search with the Any Words, All Words and Exact Phrase option. A summary is also displayed at the bottom of the home screen to show user what type or kind of file/document it is.
Document Search Filters
This feature is the Documents section allows the user to apply various search filters to find specific terms in the table and documents within LiveFile. By default the Search Text box uses the Include filter, to further refine the results the following options are available under the Limit Search To... drop-down box.

Include Fields
The fields Filename, Summary and Notes are all checked by default but this can be changed to pull only the necessary information out if needed.
Include Files
This filter is used to search for either all files within that entities documents or only the files that have been checked out.

Adding Files.
Right clicking on the homepage screen and selecting ADD NEW DOCUMENT opens the view below
![]()
Details Page: This page contains details about file and document that is about to be added. The following needs to be completed on the details page before a file or document can be saved onto the application.
Business Unit: The business unit the document relates to.
Entity Name: The Entity the document relates to
Document Type: A customizable field where the document type is specified.
Form Type: A customizable field where the form type is specified.
Date Published: Date when the file is published
Load Default Options: this enable user to load a default that has been added onto the application under file default settings. Once pressed, user will not have to input much details because they will be auto populated from the default that has been set for it.
Responsible: The person adding the file
Assigned Date and Responsibility: Date file and document assigned and to whom The person who will control the Document
Management: Is the document going to be version controlled or unmanaged.
Auto Publish Tick box: This enables files and document to be auto published straightaway once it been added onto the application.
Retention Date: How long the document will remain active before expiring
No Retention Date Tick Box: This enable files and documents to be added without a retention date.
Override Retention Date Tick Box: This enable users to override a retention date and make a file or document active again.
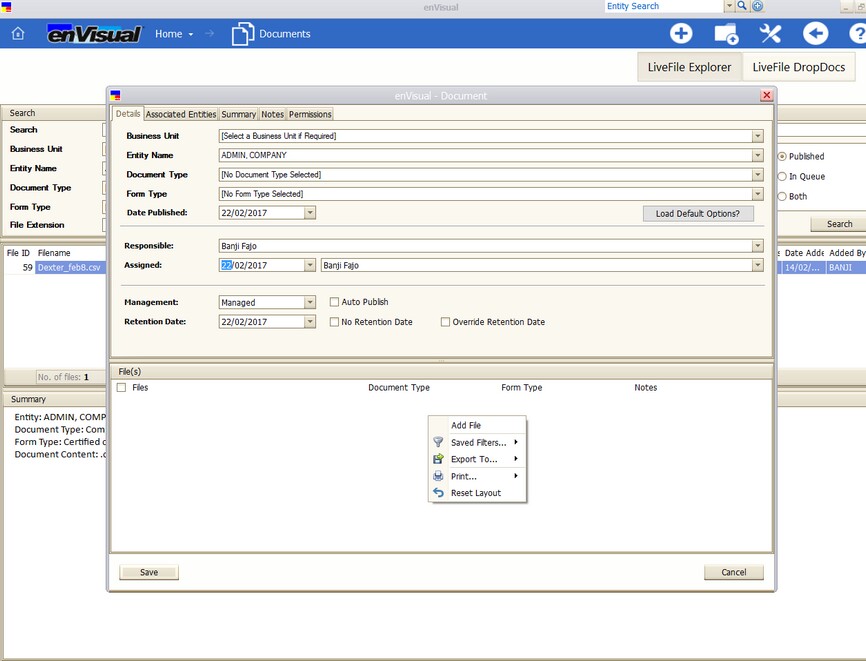
Right clicking in the files area and selecting the add file as displayed above enable user to add file and document itself to the application. Once selected, this enable a new window to be opened where user can then find the file location and add it on. Note: the document type, form types and notes available here in files area can be used when adding multiple files with different document / form types and notes. When changed, will display individually for the file selected.
Associated Entities: This page enables users to add any other entities that might be associated to the file and document that is been added. By pressing the associate button, this displays the GES (Global Entity Search) which can they be used to search for the required entity and add on for the file. A file or document can have more than one associated entity attached to it. User can also remove associate entity that is not required anymore by using the remove button.

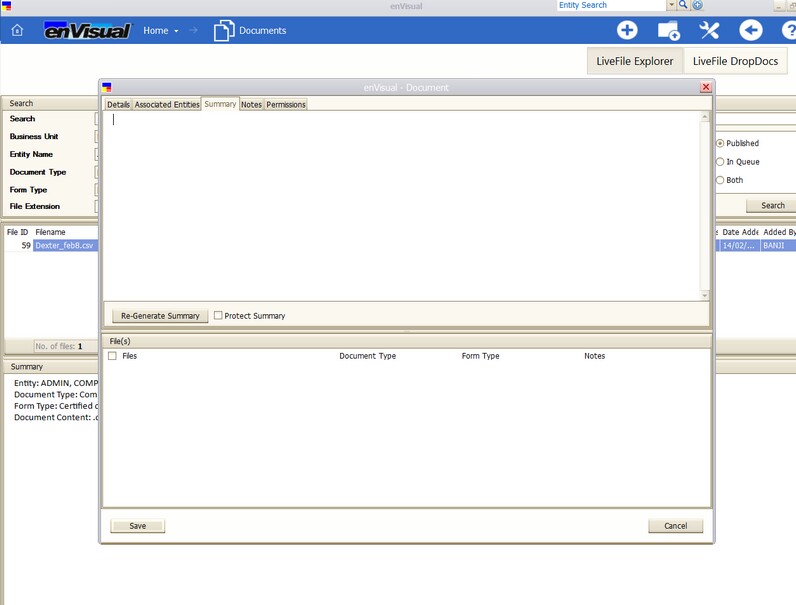
Summary: This page can be used to describe the file and document that is been added. This page will contain the file summary for a quick reference as to what the file and document is. This also displays at the bottom of LiveFile Homepage when a file/document has been selected. Re-Generate Summary: This enable user to regenerate summary to an original state before editing. This enables users to undo any changes they might have done to the summary. Protect Summary Tick Box: This protect the summary from been edited. When the tick box has been selected, users cannot edit the summary. The box will have to be unticked before editing can be done.
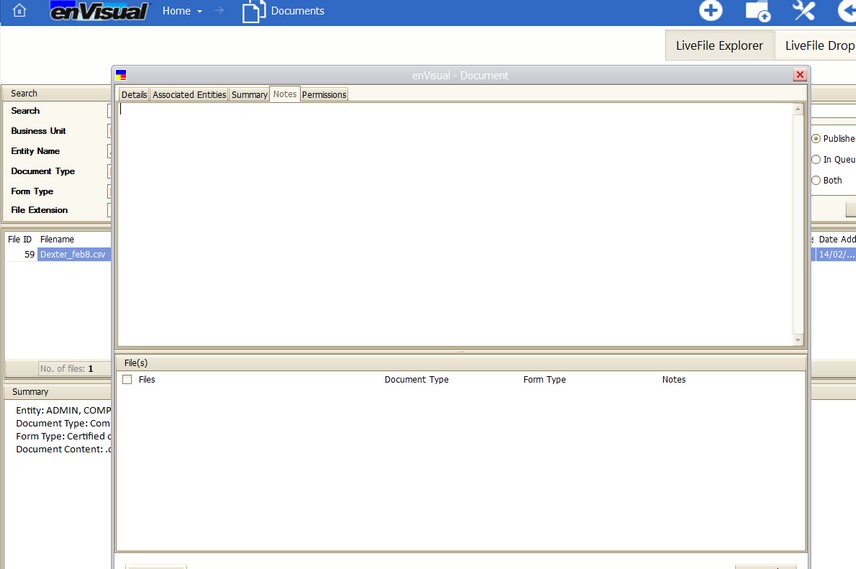
Notes: This can be used by users to leave any note for the file and document been added.
Permission: This page enables security to be done for the file added. This can be used to decide who and what group will have access to the file. User can add, edit and delete both user and group as required.
User File Permissions
Adding User File Permissions: By pressing the add button will enable user add another user to the file. Adding user window (Document Permissions) will be displayed, user can then be selected, permissions tick boxes ticked as required and then press the save button.
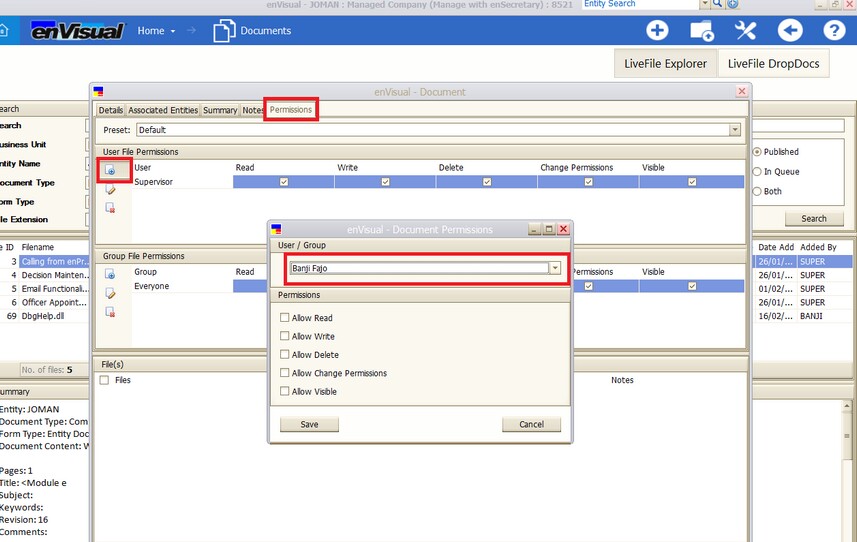
This will then add another user to the grid as shown below

Editing User File Permissions: By pressing the edit button will enable user edit a user. The user has to be selected first before pressing the edit button. This will then open the edit box as shown below
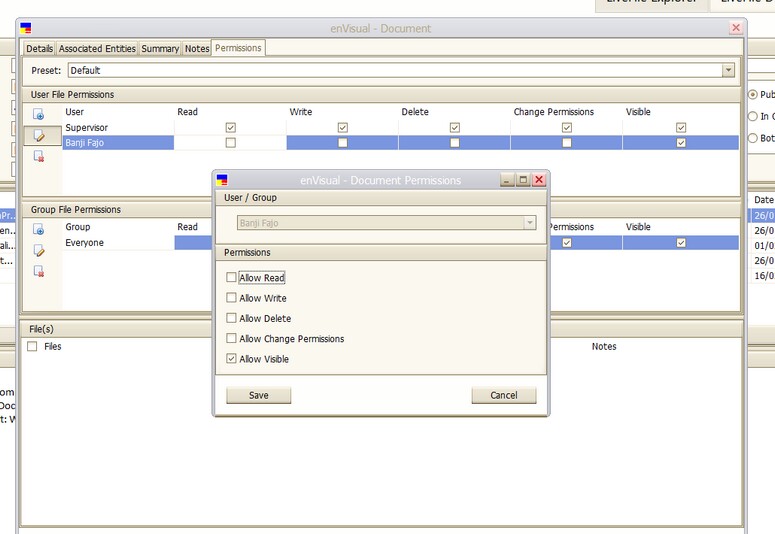
The user field will be greyed out and the tick boxes tick able. Once user have finished editing, press the save button to save changes to be displayed on the grid.
Deleting User File Permissions: By pressing the delete button will enable user delete a user.
The user has to be selected first before pressing the delete button.
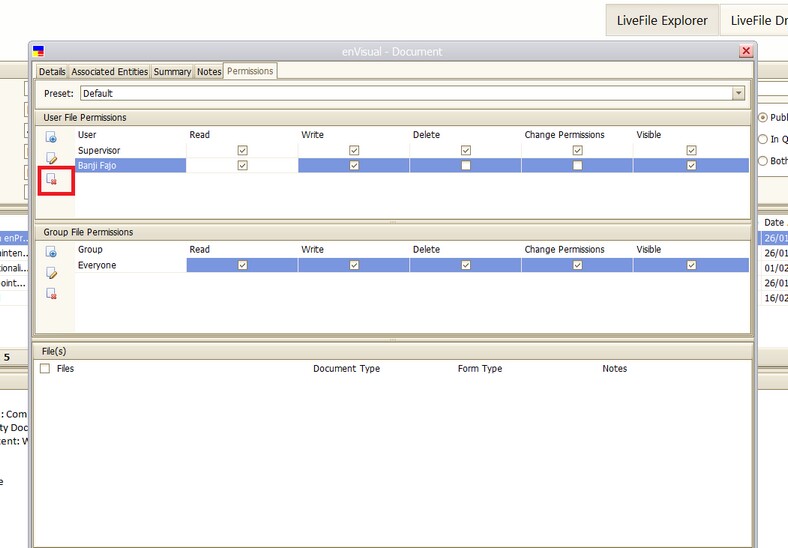
Note: user have to ensure that right user is selected and highlighted before pressing the delete button because no warning sign is given before user is deleted.
Group File Permissions
Adding Group File Permissions: By pressing the add button will enable a user add another Group. Adding group window (Document Permissions) will be displayed, user can then select the group needed, permissions tick boxes ticked as required and then press the save button.
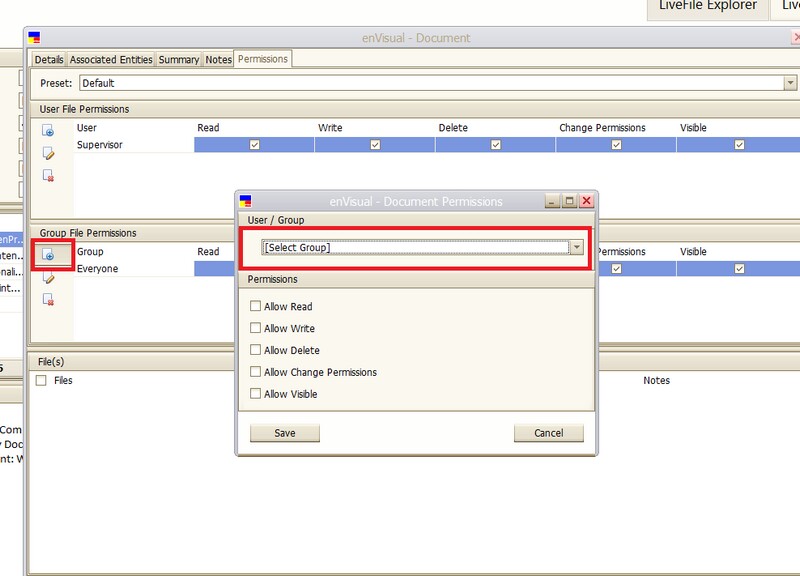
This will then add another group to the grid as shown below
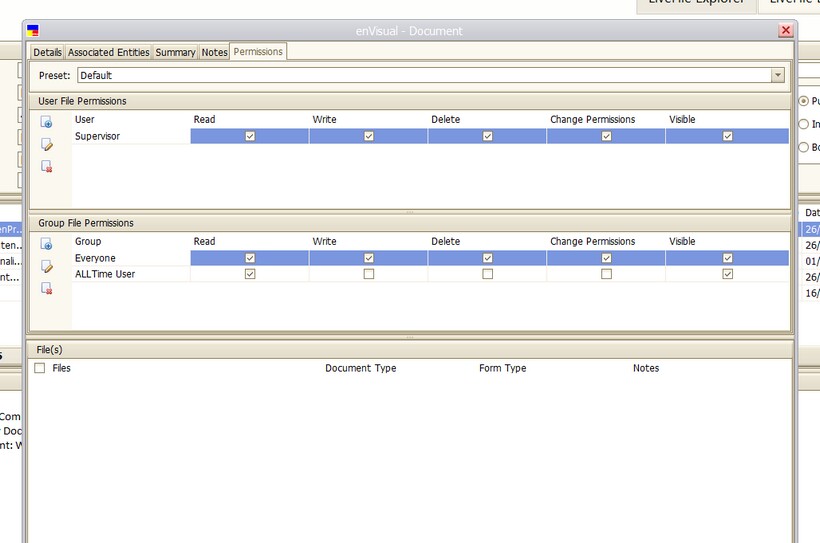
Editing Group File Permissions: By pressing the edit button will enable user edit the Group. The user has to select the group to edit first before pressing the edit button. This will then open the edit box as shown below
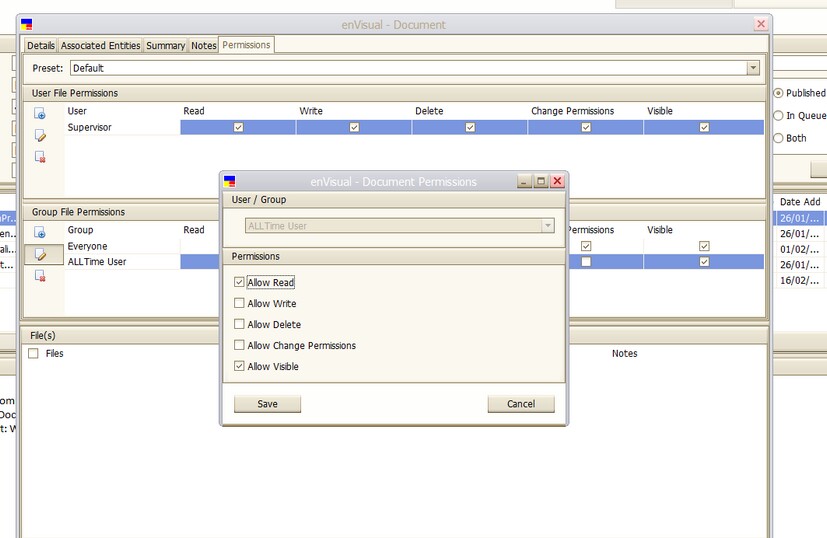
The group field will be greyed out and the tick boxes tick able. Once user have finished editing, press the save button to save changes to be displayed on the grid.
Deleting Group File Permissions: By pressing the delete button will enable user delete the group. The user has to select the group to delete first before pressing the delete button.
Note: user have to ensure that the right group is selected and highlighted before pressing the delete button because no warning sign is given before group is deleted.

Once all these have been completed and user press the SAVE button, this will then add the file or document onto the application and can be visible for search
Right Click Menus
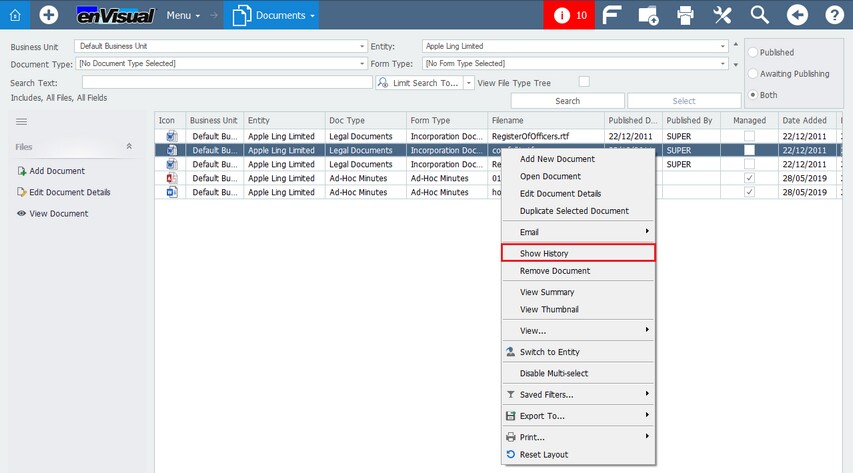
Standard document right click menus includes: Add New Document, Open Document, Edit Document Details, Publish Document, Filter on Entity and BU (Business Unit), Show History and Remove Document with envisual360 standard grid right click menus.
However, a Managed Document has additional right click menus which are not available for unmanaged documents. These menus enable the control and monitor of managed documents. These menus are: Open/Edit Document Contents, Check Out, Check In, Undo Check Out and Finalise / Un-finalize.
Viewing Files and Documents (Open Document)
Open Document is used to view a document contents. When selected, will open a window where the file or document contents can be viewed. Note: If the document is an unmanaged document, any changes made to the document content and saved, will update the document when next viewed again. If the document is a managed document, any changes or edit done will not be saved to the file. To edit a managed document content, the Check Out document option will have to be used which will then change the label to display 'Open / Edit Document Contents'

Edit Document Details.
This option is available for all documents. This is to edit the document details and not the contents. When selected, Edit Document form is opened to enable editing the document details as required. Please note, there is a difference between editing document details and editing document contents details. Document details are just the information about the file or document that is saved, while the content contains the information for the file and document itself.
Publish Document
This option is available for all documents. It is used to publish document that has been checked and fully ready to be pushed into LiveFile. When selected, will publish a document that has been added on to LiveFile. Note, once a document has been published, it cannot be un published. Also selecting an unpublished file and inputting a date will not actually publish the file. It will only display a publish date on the grid.
Check Out
This menu is only available for a managed document. When a managed document is checked out, the right click open document will be changed to ‘Open/Edit Document Contents’, which then allows the document to be edited as required and saved.
Select Check Out menu will first display a prompt message and then click yes will display below
The directory is the location where the document will be checked out temporary. Notes section can be used to input any relevant information why the document is being checked out. Click save will close the window and then tick the checked-out tick box on the homepage screen grid.
Undo Check Out.
This menu is only available for a managed document. Menu is displayed when a document has been checked out, this allows an option to undo the check out if required.
Check In
This menu is only available for a managed document. This option is used to check document back in once a check out has been completed. Select Check In will display a prompt message, click yes will display below

The file section is not editable and has been greyed out and disabled. however, the summary and notes sections can be edited as required. Click save to close the check in window. This will create a new version number for the managed document in show history and untick the checked-out tick box column on the grid. Note, a copy of the checked-out file is still visible at the location the file was checked out to. This can be deleted as required if no longer needed.
Finalise / Un-Finalise
This menu is only available for a managed document. This is used to finalise a document, once it been added and published. A document that is currently checked out cannot be finalised. A finalise document can be un-finalise if required.
Show History
This option is available for all documents. This is used to view the history of a file. This displays the action and version history. Selecting the show history displays the window below

Remove Document
This option is available for all documents. This is used for removing documents that is not required or needed on LiveFile anymore. A document within its retention period cannot be removed. To delete such document, either remove the retention date or use the ‘Override Retention Date’ checkbox.
LiveFile Explorer Feature Enhancement
LiveFile Explorer has now been enhanced with the following:
Left panel buttons enabled
Add, Edit and View Document options now also available on left panel.
Filter on Entity and BU
This option is available for all documents. This can be used when a search has been done and it returned lots of files with different entities and Business Units. By selecting this option, this reduces the grid display to that entity alone with the Business Unit selected displayed
Email File
Ability to send a LiveFile document to outlook now enabled within LiveFile using the RCM > Email File. This option is available for all documents.

Important Note: when using this the email feature through a remote app (RDWeb), it will load outlook from the remote machine (server), so outlook must be configured on there first for that user.
Rename File
This option is only available for managed documents. This option can be used to rename a file name on the grid as required.
Enable / Disable Multi-Select
This option can be used when sending more than one document to outlook from LiveFile. With the option enabled, multi selection on the grid is enabled and multiple files can be selected to send to outlook and with the option disabled, only one file can be selected at a time on the grid. Please note, the Multi Select feature is only currently enabled for email outlook function.
LiveFile Document History
The LiveFile document History feature allows users to see a detailed changes timeline of a document, showing every time it has been viewed, edited, checked in/ out, or when a new version has been created from the original file. This feature is located in the Document section, right-click the file and select Show History. The History window will display the following pages:
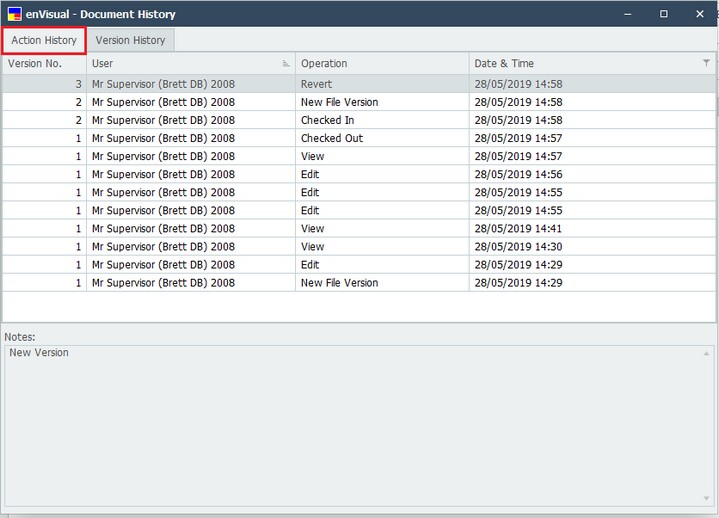
Action History
This page shows if the file has been viewed, edited, checked in/ out, or if a new version has been created from the original file. The grid displays the version of the document, the time and date it was modified and the user who made the changes.
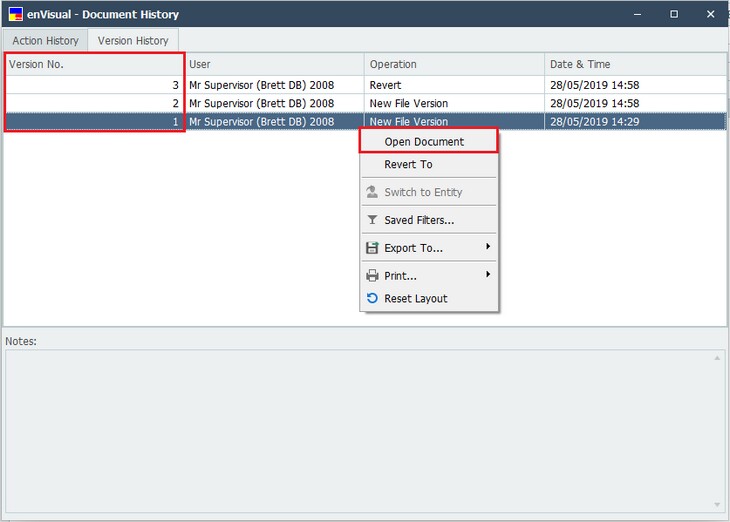
Version History
Each change to the uploaded document is saved as a separate file stored within this section and can be accessed at any point. This page displays the same grid. however, the user now has the option to open any version of the document since it was uploaded.
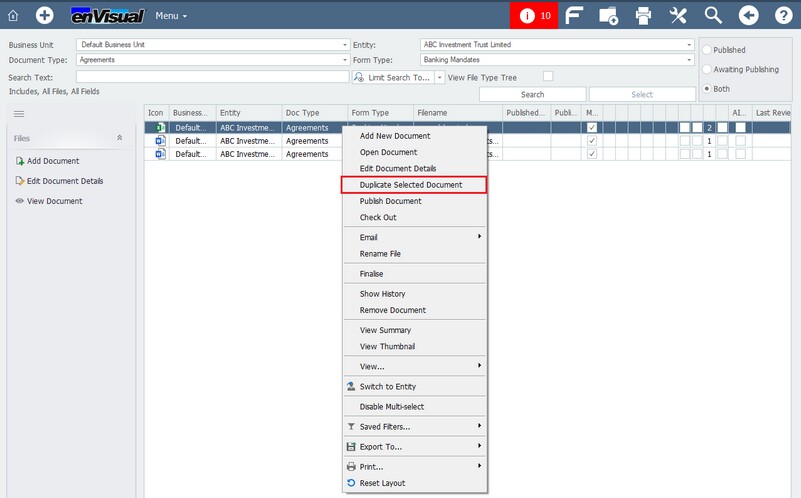
Duplicating Documents
Any document stored within LiveFile, both managed and unmanaged, can be duplicated along with the settings attached to the original document. This can be done by right-clicking the required document and selecting Duplicate Selected Document, which will then duplicate the file with all the settings attached.
Bulk Edit
The bulk edit feature within LiveFile Explorer allows the user to highlight multiple documents and edit the following fields together: Business Unit, Document Type, Entity and Form Type.

Updating these fields will update all the selected documents and move them to the correct areas within LiveFile.

Checked Out Files
This feature checks for any currently checked-out documents when exiting enVisual 360. When closing the application, if there are any files that are checked out, the user is given the following options:
Review and check in
This option returns the user to LiveFile and lists all checked-out files to then be checked-in or left checked-out.
Keep files checked out and exit
Selecting this option will close enVisual and leave those files checked-out.
Cancel action, return to enVisual
This option will cancel exiting the application, returning the user to enVisual and keeping those files checked-out.
