A more advanced way to formulate queries is contained within the following interface, available from the "Advanced Queries" tab:
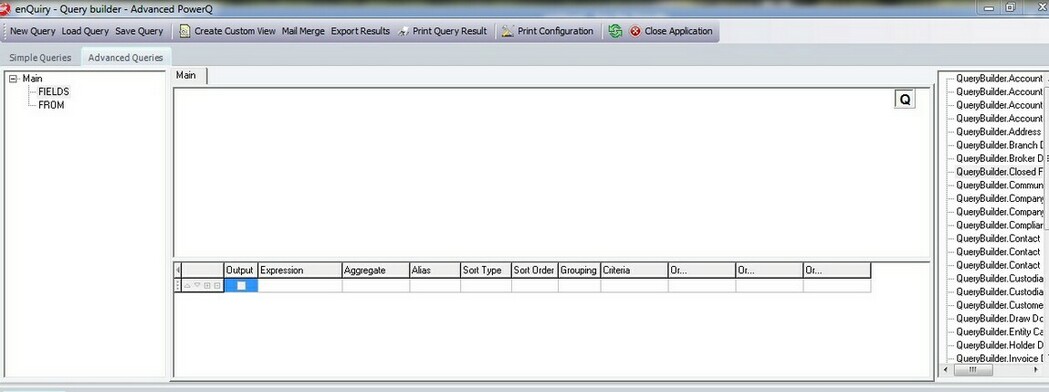
This interface allows drag and drop of the tables listed on the right hand side to the blank area of the interface, just above the toolbar (toolbar explained in the "Simple Queries" section).
When we drag tables from the right hand columns onto the query template (the blank section) we are presented with a dialogue for each table and the list of fields available within those tables. Here we are presented with the contact details and the address details with the list of fields available in each and check boxes to indicate which fields we wish to include in the query.
Here are the "Contact Details" and the "Address Details" tables with chosen fields selected:
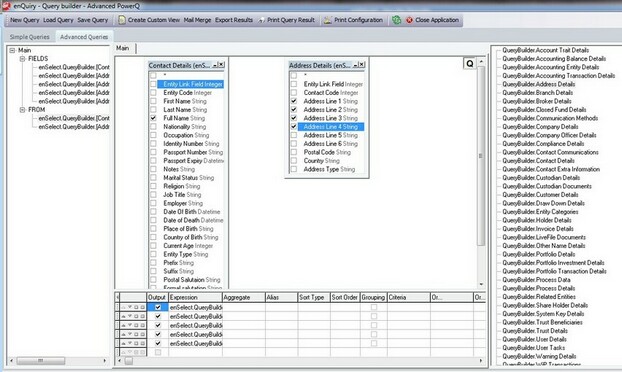
Although the query above will work, the data will be disjointed because there are no joins on the associated tables. In order to relate the data together it is necessary to drag the appropriate join fields from one table to the other table. This will require knowledge of the underlying table structures and SQL to understand which fields are related i.e. Primary and foreign key joins.
Also note the "Fields" sections and the "From" sections in the left hand column which list the from clause and the list of fields to be used in the query.
In the example tables above it can be seen that both have the field "Entity Link Field". These will be used to link the tables together to provide related information by clicking on one of them and dragging it over to the other table. This will look like the following screenshot:
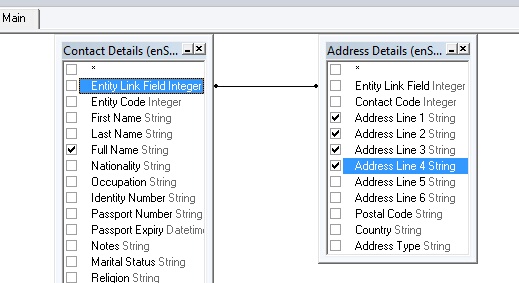
This query will output all the fields checked in both tables that are related based on the join condition, determined by the line connecting the two fields in both tables, "Entity Link Field". Also note than in this query however, it is not necessary to output those fields as they are only used to join the related data together in both of the tables.
When the query is run the output in this case for our example database is as follows:
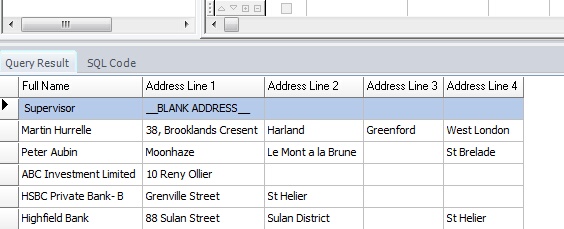
The output lists the fields chosen from the dialogues previously in our example database.
Join Types
To access information about a join condition it is necessary to "right click" on the line containing the join and then click on the "properties" of the join condition, as in the following dialogue explained below.
In constructing the above joins it is possible to determine the type of join to use. These are termed "left" joins and "right" joins and refer to the tables on either the left or right of the join condition. In the previous example the left table would be the "Contact Details" table and the right table is the "Address Details" table.
If a "left" join is chosen the query will return all rows from the left hand table, even if there are no matches in the right hand table. If it is a right hand join the query returns all rows in the right hand table, even if there are no matching rows in the left hand table. This is best served by an example as follows; right click on the line containing the link to the join fields and you will then be presented with the following dialogue:
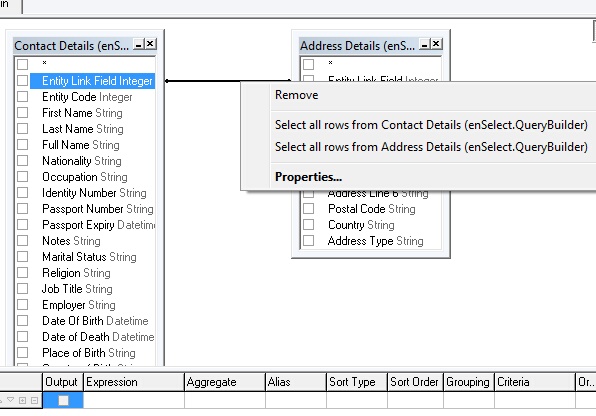
A right or left join can be chosen from the above options or if you click the "properties..." button it presents you with the following dialogue:
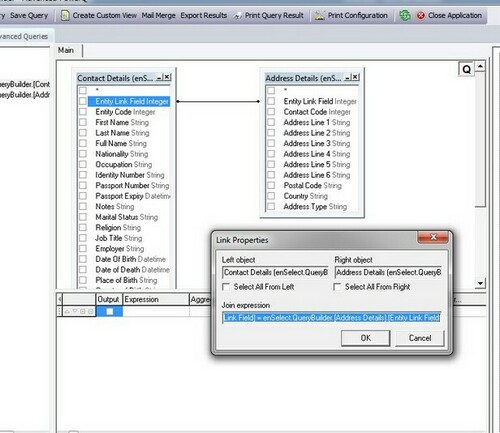
This provided more detail about the join conditions and the text of the query can be edited (in the join expression field) so that it can be changed to whatever the user wants. By clicking on the "Select All From Left" and "Select All From Right"check boxes (right/left or both) the join condition is ascertained from the beginning. By clicking on both the comparisons are made for links on both sides of the join i.e. the join condition checks for data in both tables.
Filtering Advanced Queries
On the top right hand corner of the main dialogue, there is a query "Q" button as illustrated:

When this is double-clicked the following dialogue is displayed:
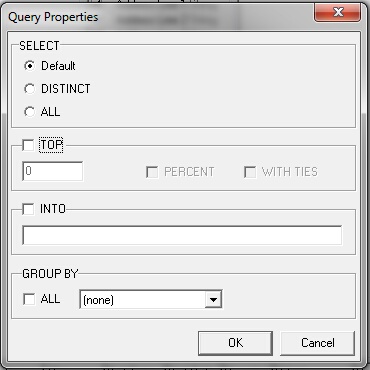
This dialogue enables filtering of advanced queries. The default option simply permits the standard query to be executed as normal, while DISTINCT only chooses rows which are the same (such as duplicated rows) and consolidates them into a single row for all the duplicates. The "ALL" clause is a Boolean value (True or False) test to see if a set of values exist, rather than returning the actual values. It is set to TRUE or FALSE. For example, the following SQL statement:
SELECT * FROM [Contact Details] WHERE ([Full Name] <> ALL (SELECT [Full Name] FROM [Contact Details] WHERE ([Entity Code] <> 300)))
Will return all the details from the "Contact Details" table where a full name does not exist that has an "Entity Code" of 300.
TOP
As the name implies, the "TOP" function allows a set number of rows to be returned from the start of the returned data. This can be stated in terms of the number of rows, entered into the box, a percentage, and the "WITH TIES" function which is explained below.
The number entered into the dialogue box refers to the number of rows to be returned if the "PERCENT" box has not been checked. If the "PERCENT" box is checked it refers to the percentage of rows to be returned from the overall result set, such as 19% of the rows rather than 19 actual rows.
WITH TIES
The with ties function returns all related rows which are the same as the last one returned, even if this means returning more rows than the numbers entered into the "TOP" function. This is best illustrated by way of an example as follows, considering a country value in our database of "Jersey":
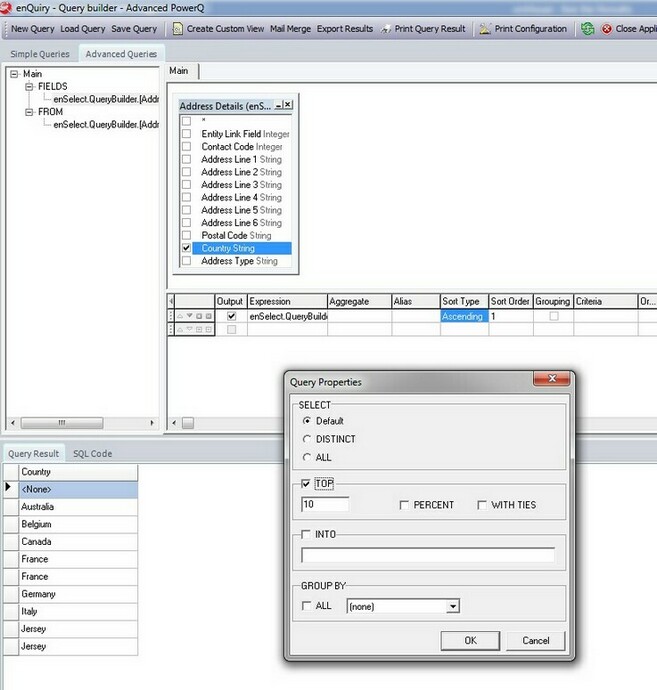
Here we have selected the top 10 countries in the query, sorted in ascending order. As you can see in this case, the bottom 2 refer to "Jersey". However, we know that there are more countries of "Jersey" to be returned in the result. So how do we return all rows referring to the last row in the result set with the same value, in this case "Jersey"?
The solution is to use the "WITH TIES" option. This allows all rows which are the same as the bottom row to be returned irrespective of how many "TOP" rows are chosen (10 in this case). When we add the "WITH TIES" option it will not only return the top 10 rows but all the rows with the same value in the result set at the end of the list. Therefore, when we run the query as follows:
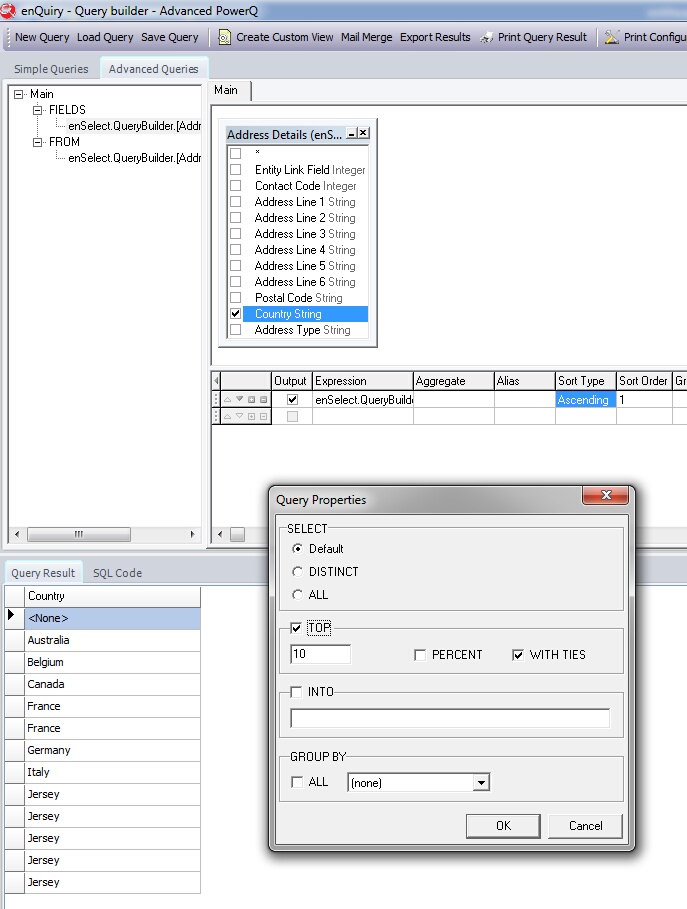
We now see that there are 13 rows, even though only 10 where originally selected. The "WITH TIES" function listed all the rows which where the same as the bottom row in the list of 10, which in this case is the country "Jersey".
INTO
The "INTO" clause allows the results of the query to be placed into another table in the database. Therefore, any output a query
can be placed into a NEW table and the field types of the fields returned will be automatically created. This enables the results of the query to be saved along with a new table which can be referenced in other queries later. To perform this function, click the "INTO" check box and then enter table name to create the table.
GROUP BY
The "Group By" function performs the same grouping functionality as with the grouping function described in the "Simple Queries" section. However, the advanced queries dialogue allows the grouping to be performed according to the following choices as shown in the screenshot:

In order to perform the query with grouping the default "none" can be chosen (although this is the same affect as choosing the grouping function in the toolbar of the main query), or the grouping function can include the "WITH CUBE" or "WITH ROLLUP" clauses. These are described below:
WITH CUBE
The grouping function that works "WITH CUBE" is designed to return all combinations of groupings within a given result set. Note that the "ALL" function in the above screen shot CANNOT be used with the "WITH CUBE" or "WITH ROLLUP" clauses, it can be one or the other only.
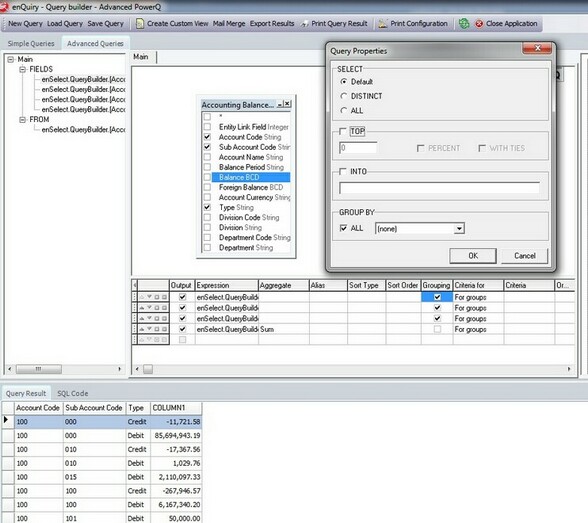
Suppose it was necessary to return the total amount for transactions of debit or credit for an account code and each sub account? How could this be achieved using the group by function. Grouping by "ALL" for a total amount would merely group by the hierarchy of fields in the order specified, such as "Group By Account Code, Sub Account, and Type", providing an overall grouping of data for the amount. In other words, the total amount returned would be based on each account code as the first item in the "GROUP BY" list.
The "WITH CUBE" function allows a total amount to be output for each combination of Account Code, Sub Account and transaction type.
Here is the difference between the outputs of each, first EXCLUDING the "WITH CUBE" function using "ALL":
And now with the grouping function using "WITH CUBE":
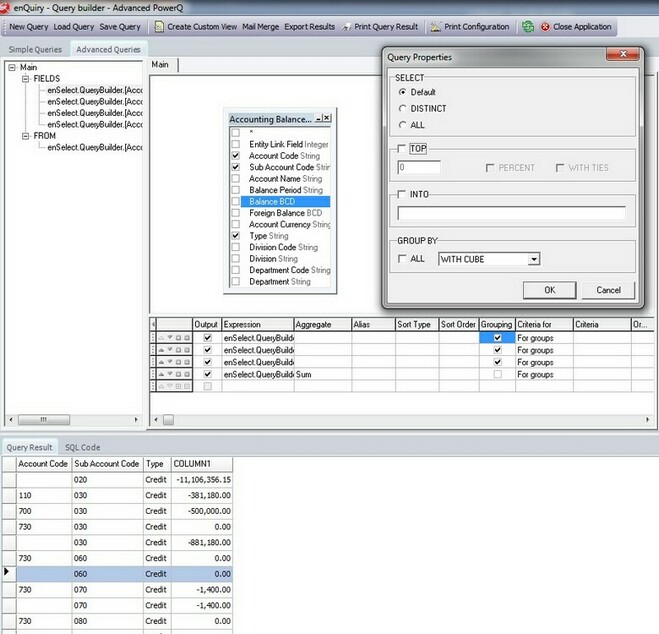
As can be seen, the grouping totals are now based on the different combinations of account code, sub account code and transaction type, giving a completely new perspective on the total amounts output.
WITH ROLLUP
The result set here is similar to the result set produced by the "WITH CUBE" option. The difference however, is that unlike producing combinations of results as for the "WITH CUBE" option, the "WITH ROLLUP" function provides a summary based on sub-sets of the data. This is best served by an example to illustrate the point.
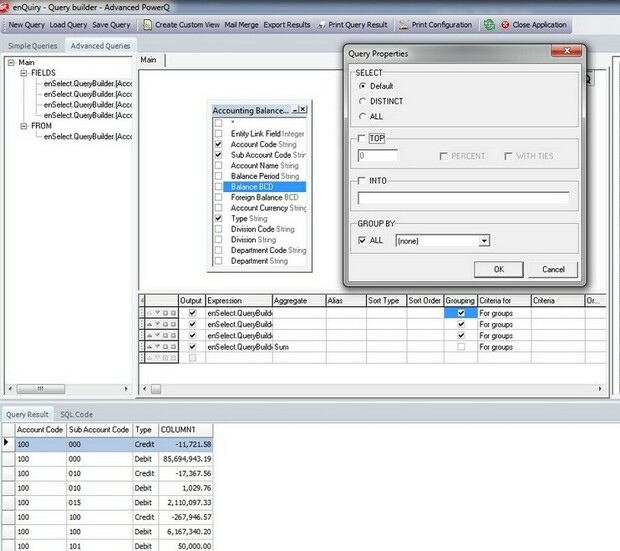
Taking our previous standard grouping query the output was:
Now we execute the grouping query again but using "WITH ROLLUP" producing the result indicated below:
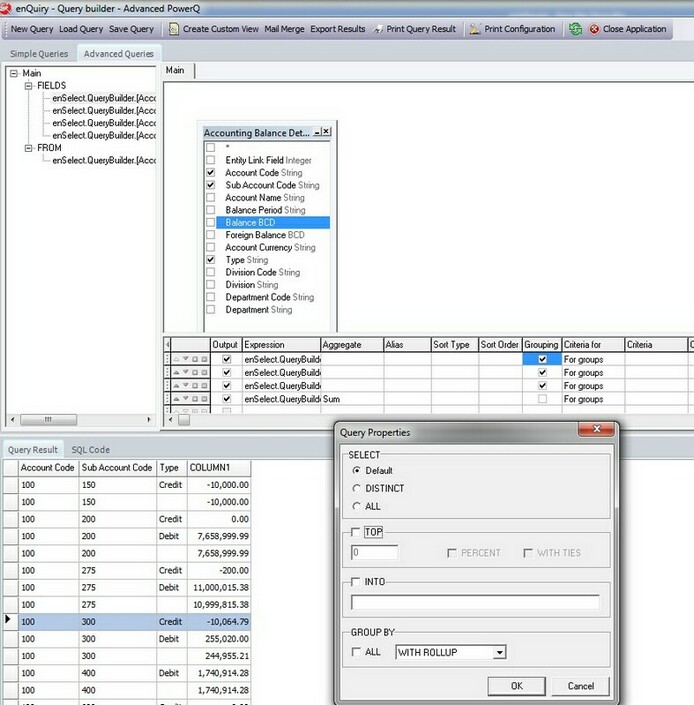
Immediately we can see that the results are ordered by the "Account Code" and that for each "Sub Account", and "Type" within the account code a different total has been output. This is what "WITH ROLLUP" does it calculates the totals for fields as a sub-group in the main query, as opposed to the "WITH CUBE" which outputs totals for combinations of each. It is a different perspective on the data, but both functions are extremely powerful and save a lot of time creating new queries when used correctly.